How To Paint Cabinets that are already Painted
Table of Contents
Repainting painted cabinets can breathe new life into your kitchen or any room with cabinets. It’s a cost-effective way to refresh your space without the expense of a full renovation. Whether you’re dealing with kitchen cabinets or other types of cabinets, this guide will help you achieve a professional look with minimal effort.
Purpose of the Guide
The purpose of this guide is to provide you with simple, step-by-step instructions on How to Paint Cabinets that are already Painted. We’ll cover everything from choosing the best paint for kitchen cabinets to the actual painting process. By the end of this guide, you’ll know how to handle cabinet painting, including painting kitchen cabinets, painting wood cabinets, and even painting kitchen cabinets without sanding. This guide is designed for DIY enthusiasts who want to tackle painting cabinets on their own.
By following this guide, you’ll learn how to:
- Select the right kitchen cabinet paint and tools.
- Prepare your painted cabinets for a new coat of paint.
- Apply paint to kitchen cabinets to achieve a smooth, durable finish.
- Explore different painted kitchen cabinet ideas and styles, like painting kitchen cabinets white or painting kitchen cabinets black.
With these instructions, you’ll be able to transform your kitchen cabinets or any painted cabinet in your home, making them look as good as new.
Preparation and Planning
Importance of Proper Preparation
Proper preparation is crucial when painting kitchen cabinets. It ensures that the new paint adheres well and lasts longer. Skipping these steps can result in a less durable finish, meaning you’ll have to repaint sooner than you’d like.
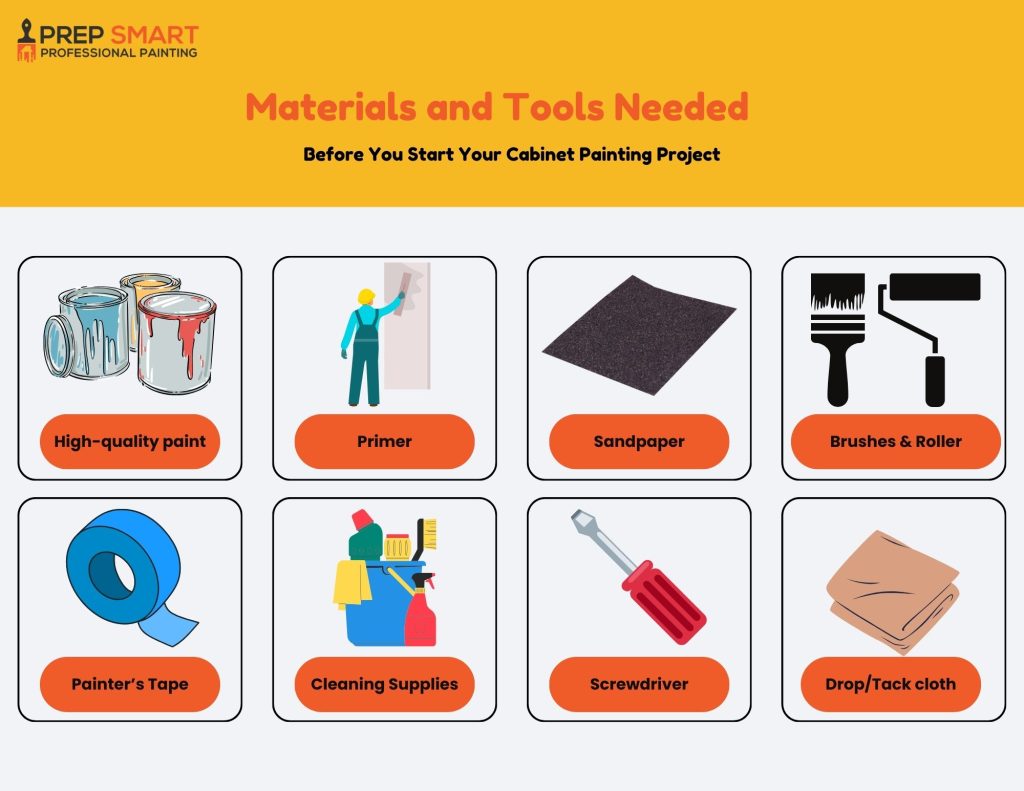
Materials and Tools Needed
Before you start your cabinet painting project, gather all the necessary materials and tools. Having everything on hand will make the process smoother and more efficient. Here’s what you’ll need:
- High-quality paint (preferably latex or oil-based): Choosing the best paint for kitchen cabinets is important for a durable and attractive finish.
- Primer: This helps the paint stick better and provides a solid base for the topcoat.
- Sandpaper (medium and fine grit): Sanding helps remove the old finish and creates a smooth surface for the new paint.
- Paintbrushes and rollers: Use these for applying the kitchen cabinet paint evenly.
- Painter’s tape: This helps protect areas you don’t want to paint.
- Drop cloths: These protect your floors and countertops from paint splatters.
- Cleaning supplies (mild detergent, sponge): Cleaning the cabinets before painting removes grease and grime that can prevent the paint from sticking.
- Screwdriver: Use this to remove the cabinet doors and hardware.
- Tack cloth: This helps remove dust after sanding, ensuring a smooth finish.

Step-by-Step Process Before Painting a Painted Cabinets
Repainting painted cabinets might seem like a daunting task, but with the right guidance, it can be a straightforward and rewarding project. This step-by-step process will walk you through everything you need to know about painting kitchen cabinets, from start to finish. By following these detailed instructions, you’ll learn how to properly prepare, paint, and finish your cabinets, ensuring a professional and long-lasting result. Let’s dive into the steps and get those cabinets painted beautifully!
Step 1: Removing Cabinet Doors and Hardware
Process
- Gather Your Tools: Before you start, make sure you have a screwdriver handy. This is the main tool you’ll need for this step.
- Remove the Cabinet Doors:
- Begin by opening each cabinet door.
- Use the screwdriver to carefully remove the screws from the hinges.
- Gently take the doors off and set them aside.
- Remove Drawers and Hardware:
- Pull out the drawers and remove any screws or clips holding them in place.
- Take off all the hardware, including handles, knobs, and hinges. This makes it easier to paint and ensures a smooth finish.
- Label Everything:
- As you remove each door, drawer, and piece of hardware, label them using masking tape and a marker. Write down their original positions (e.g., “upper left door” or “bottom right drawer”).
- Place screws and small hardware pieces in labeled plastic bags to keep everything organized.
Time Estimate
Removing the cabinet doors and hardware will take about 1-2 hours. Taking your time with this step ensures you won’t have trouble reassembling everything later.
Step 2: Cleaning the Cabinets
Process
- Prepare Your Cleaning Solution:
- Mix a small amount of mild detergent with warm water in a bucket. This solution will help remove grease and grime from your painted cabinets.
- Wash the Cabinets:
- Dip a sponge or cloth into the cleaning solution.
- Wring out the excess water to avoid soaking the cabinets.
- Wipe down all surfaces of the cabinets, including doors, drawers, and the cabinet frames. Pay special attention to areas around handles and knobs, where grease tends to build up.
- Rinse and Dry:
- After washing, rinse the cabinets with clean water to remove any soap residue.
- Use a clean, dry cloth to wipe down the cabinets and remove excess moisture.
- Allow the cabinets to dry completely before moving on to the next step. This might take a few hours, so be patient.
Importance
Cleaning your cabinets thoroughly ensures that the new kitchen cabinet paint will adhere properly. Grease, grime, and dirt can prevent paint from sticking, leading to a less durable finish. Clean surfaces are essential for a smooth and long-lasting result when repainting kitchen cabinets.
Step 3:Sanding the Cabinets
Process
- Gather Your Sanding Materials:
- You’ll need medium-grit sandpaper (around 120-150 grit) and a tack cloth. These will help you prepare the surface for painting.
- Lightly Sand All Surfaces:
- Take the medium-grit sandpaper and gently sand all the surfaces of the cabinets. This includes the doors, drawers, and frames.
- The goal is to scuff up the existing paint, not to remove it completely. This roughens the surface, helping the new primer and paint adhere better.
- Use Circular Motions:
- Sand in a circular motion or with the grain of the wood. This technique ensures an even surface and prevents deep scratches.
- Wipe Down with a Tack Cloth:
- After sanding, use a tack cloth to wipe down all the surfaces. This will remove any dust and debris created by the sanding process.
- Make sure the cabinets are completely dust-free before moving on to the next step.
Importance
Sanding is a crucial step when learning how to paint cabinets that are already painted. It creates a surface for the primer to adhere to, ensuring the paint sticks well and lasts longer. Proper sanding is essential for a professional-looking finish when repainting kitchen cabinets.
Step 4:Priming the Cabinets
Process
- Choose a High-Quality Primer:
Select a primer specifically suited for painted surfaces. This ensures that it will adhere well and provide a good base for the new paint. - Apply the Primer:
- Use a brush for detailed areas, like corners and edges.
- Use a roller for larger, flat surfaces, like the fronts and sides of the cabinet doors and drawers.
If you want to know more about how long does primer take to dry, be sure to check out our detailed guide on drying times to ensure a smooth and professional finish. Which tells about how exactly the drying process of primer works.
Brush and Roller Types and Uses
When priming and painting your cabinets, using the right tools is crucial for achieving a smooth and professional finish. Here’s a detailed look at the types of brushes and rollers you should use and how to use them effectively.
| Tool Type | Description | Best For | How to Use |
| Angled Brush | Brush with angled bristles for precision | Detailed areas like corners, edges, and trim | Dip the brush into the primer, tap off excess. Use smooth, even strokes to cover detailed areas. The angle helps reach tight spots. |
| Flat Brush | Brush with flat, straight bristles | Flat surfaces and wide edges | Dip into the primer, tap off excess. Apply in long, smooth strokes for even coverage on flat surfaces. |
| Foam Brush | Brush with a foam head for smooth application | Small touch-ups and hard-to-reach areas | Dip lightly into primer, apply gently to avoid drips. Ideal for small or intricate areas. |
| Small Roller | Roller with a small diameter (4-6 inches) | Narrow, flat surfaces like cabinet fronts | Pour primer into a tray, roll the roller into the primer, then apply evenly in smooth, overlapping strokes. |
| Medium Roller | Roller with a medium diameter (7-9 inches) | Larger, flat surfaces like the sides of cabinets | Pour primer into a tray, roll the roller into the primer. Apply with even pressure, rolling in a “W” pattern for uniform coverage. |
| Foam Roller | Roller with a foam cover for ultra-smooth finish | Flat surfaces requiring a very smooth finish | Dip lightly into the primer, roll off excess on a tray. Apply with light pressure to avoid bubbles and ensure a smooth finish. |
Things to Avoid and Take Care Of
Avoid Overloading the Brush or Roller
- Why: Too much primer can cause drips and uneven coverage.
- Consequence: If not taken care of, this can result in a bumpy, unattractive surface that requires extra sanding and additional coats of paint to fix.
Watch for Drips and Bubbles
- Why: Drips and bubbles can create an uneven surface.
- Consequence: If not smoothed out immediately, these imperfections will be visible through the topcoat, making your painted cabinets look unprofessional.
Ensure Good Ventilation
- Why: Working in a well-ventilated area helps the primer dry properly and prevents inhalation of fumes.
- Consequence: Poor ventilation can lead to slow drying times and health issues due to fume inhalation.
Protect Surrounding Areas
- Why: Painter’s tape and drop cloths protect areas that you don’t want to get primer on.
- Consequence: Without protection, you could end up with primer on floors, countertops, and other surfaces, leading to additional clean-up and possible damage. Selecting which painter’s tape to use and how to remove it is crucial, so for that, check out our blog on how to remove painter’s tape.
How long should I wait between coats of paint?
It’s important to wait at least 24 hours between coats of paint. This allows each layer to dry completely, ensuring a smooth and durable finish. If you’re in a hurry, you might be tempted to rush this step, but patience pays off with a better-looking result.
What should I do if I notice dust or debris on the paint?
If you notice dust or debris on the paint, gently sand the affected area with fine-grit sandpaper (like 220 grit) once the paint is dry. Wipe the surface with a tack cloth to remove any dust before applying another coat of paint. Keeping your work area clean can help prevent this issue.
How can I prevent brush marks when painting cabinets?
To prevent brush marks, use high-quality brushes and apply paint in thin, even coats. Adding a paint conditioner like Floetrol can help the paint flow better and reduce brush marks. Also, avoid going back over areas that have started to dry.
What if the paint starts peeling after a few weeks?
If the paint starts peeling, it’s likely due to poor surface preparation. Sand the peeling areas to smooth them out, clean thoroughly, and apply a high-quality primer before repainting. Ensuring the surface is properly prepared is key to preventing peeling.
Can I paint over hinges and hardware, or should I remove them?
It’s best to remove hinges and hardware before painting. Painting over them can lead to an uneven finish and make it difficult to open and close the cabinets. Remove all hardware and label them for easy reassembly after painting.
How can I ensure the paint color stays true over time?
To ensure the paint color stays true, use a high-quality primer and paint designed for cabinets. Avoid exposing the painted surfaces to excessive moisture and sunlight. Applying a clear topcoat can also protect the paint and keep the color vibrant.
What should I do if the cabinets start feeling sticky after painting?
If the cabinets feel sticky, it might be because the paint hasn’t fully cured. Allow more time for curing, which can take up to a week or more depending on the paint type and environmental conditions. Avoid using the cabinets until the paint feels completely dry and hard to the touch.
Steps for Painting the Cabinets
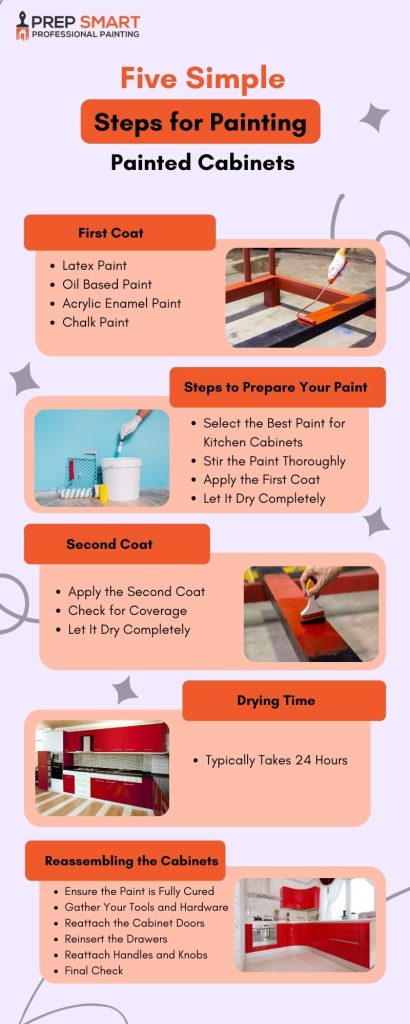
First Coat
-
Prepare Your Paint
- Select the Best Paint for Kitchen Cabinets: When choosing paint for your kitchen cabinets, it’s important to select a type that is durable, easy to clean, and provides a smooth finish.
-
Latex Paint
- Pros:
- Easy to clean up with soap and water.
- Dries quickly.
- Low odor.
- Cons:
- Less durable than oil-based paint.
- May require more coats for full coverage.
- Can chip or scratch more easily.
- Best For: Cabinets that don’t see heavy use, or for DIY projects where ease of application and clean-up are priorities.
- How to Use: Stir thoroughly before use. Apply with a brush or roller. Ensure proper ventilation during application.
- Pros:
-
Oil-Based Paint
- Pros:
- Extremely durable and resistant to wear.
- Provides a smooth, hard finish.
- Great for high-traffic areas like kitchens.
- Cons:
- Longer drying time.
- Requires mineral spirits or turpentine for cleanup.
- Strong odor during application and drying.
- Best For: High-traffic areas where durability is crucial, such as kitchen cabinets that get a lot of use.
- How to Use: Stir thoroughly before use. Apply in a well-ventilated area due to strong fumes. Use a brush or roller for application.
- Pros:
-
Acrylic Enamel Paint
- Pros:
- Combines the benefits of latex and oil-based paints.
- Durable and easy to clean.
- Dries faster than oil-based paint.
- Cons:
- Can be more expensive.
- Requires good ventilation during application.
- Best For: High-use areas where a durable, easy-to-clean finish is needed.
- How to Use: Stir thoroughly before use. Apply with a brush or roller. Follow the manufacturer’s instructions for best results.
- Pros:
-
Chalk Paint
- Pros:
- Easy to apply and versatile.
- Great for a matte, vintage look.
- Minimal surface prep required.
- Cons:
- Requires a protective topcoat (wax or polyurethane) to be durable.
- May show brush strokes.
- Best For: Projects where a matte, vintage finish is desired, and for those looking for a quick and easy application.
- How to Use: Stir thoroughly before use. Apply with a brush. Seal with wax or polyurethane for durability.
- Pros:
Steps to Prepare Your Paint
- Select the Best Paint for Kitchen Cabinets:
- Choose the type of paint based on your needs: durability, finish, and ease of application.
- Stir the Paint Thoroughly:
- Use a paint stirrer to mix the paint until it has an even color and consistency.
- This ensures that any settled pigments are fully integrated.
- Apply the First Coat:
- Brush Application: Use an angled brush for detailed areas like corners, edges, and trim. Apply the paint in smooth, even strokes.
- Roller Application: Use a small roller for narrow, flat surfaces and a medium roller for larger, flat surfaces. Roll the paint on evenly, using a “W” pattern to ensure full coverage.
- Let It Dry Completely:
- Allow the first coat of paint to dry thoroughly. This typically takes around 24 hours.
- Make sure the area is well-ventilated to help the drying process.
Second Coat
- Apply the Second Coat:
- After the first coat is completely dry, apply the second coat using the same method.
- Ensure you use even strokes with the brush and a smooth rolling technique to avoid streaks and ensure full coverage.
- Check for Coverage:
- Look for any thin areas or spots that need extra attention.
- The second coat will help cover any areas that might have been missed or need more coverage.
- Let It Dry Completely:
- Just like the first coat, allow the second coat to dry completely. This usually takes another 24 hours.
Drying Time
- Typically 24 hours: Make sure the second coat is fully dry before deciding if additional coats are necessary.
Reassembling the Cabinets
Process
-
Ensure the Paint is Fully Cured:
- Before reassembling your painted cabinets, make sure the paint is fully cured. Curing usually takes longer than drying and ensures the paint is hard and durable.
- This can take several days to a week, depending on the type of paint used and the environmental conditions. Check the manufacturer’s instructions for specific curing times.
-
Gather Your Tools and Hardware:
- Have your labeled hardware, screws, and tools (like a screwdriver) ready.
- Organizing your tools and hardware will make the reassembly process smoother and faster.
-
Reattach the Cabinet Doors:
- Start by reattaching the cabinet doors. Align the hinges with the screw holes on the cabinet frame.
- Use your screwdriver to insert and tighten the screws securely. Ensure the doors are aligned properly and open and close smoothly.
-
Reinsert the Drawers:
- Slide the drawers back into their respective slots. Ensure they glide smoothly and are aligned correctly.
- If the drawers have hardware that needs to be reattached, do this now, following the same process as with the doors.
-
Reattach Handles and Knobs:
- Reattach all handles, knobs, and other hardware to the doors and drawers.
- Use a screwdriver to secure them in place, ensuring they are tight and functional.
-
Final Check:
- Once everything is reassembled, do a final check. Open and close all doors and drawers to make sure they function properly.
- Wipe down any fingerprints or smudges on the newly painted surfaces.
Need Professional Help? Contact Prep Smart!
If the idea of painting kitchen cabinets or repainting painted cabinets seems daunting, don’t worry – Prep Smart is here to help! We are professionals in cabinet painting and can assist you with every step of the process. From selecting the best paint for kitchen cabinets to ensuring a flawless finish, our expert team has the experience and skills to transform your painted cabinets into beautiful, durable works of art. Whether you’re looking for guidance on how to paint cabinets or need a complete kitchen cabinet painting service, Prep Smart is your go-to solution. Let us take the hassle out of your cabinet painting project, so you can enjoy stunning results without the stress. Contact Prep Smart today and see how we can make your kitchen look new again!
Tips for Best Results
Achieving the best results when painting kitchen cabinets involves more than just following basic steps. Here are some lesser-known but highly useful tips that can make a significant difference in the quality of your cabinet painting project.
Degloss Before Sanding
- Tip: Use a deglosser before you start sanding your painted cabinets.
- Why: Deglossing removes the shiny finish from old paint, making it easier for the new paint to adhere. This step can significantly improve the durability of your kitchen cabinet paint.
- How: Apply the deglosser with a clean cloth according to the manufacturer’s instructions. Let it sit for the recommended time, then wipe it off before you start sanding.
Use a Tinted Primer
- Tip: Tint your primer to match the color of your final kitchen cabinet paint.
- Why: Tinted primer provides better coverage and reduces the number of paint coats needed, saving you time and effort.
- How: Ask the paint store to add a small amount of your chosen paint color to the primer. Apply the primer as you normally would, following the drying times recommended by the manufacturer.
Sand Between Coats
- Tip: Lightly sand between each coat of paint.
- Why: Sanding between coats removes any imperfections and helps the next coat adhere better, resulting in a smoother finish.
- How: Use a fine-grit sandpaper (220 grit) to lightly sand the surface after each coat has dried. Wipe down with a tack cloth to remove any dust before applying the next coat.
Use Floetrol for a Smooth Finish
- Tip: Add a paint conditioner like Floetrol to your kitchen cabinet paint.
- Why: Floetrol helps to reduce brush marks and improve the flow of the paint, leading to a smoother, more professional finish.
- How: Mix Floetrol into your paint according to the manufacturer’s instructions. Stir well and proceed with your painting as usual.
Label Hardware and Doors
- Tip: Label each piece of hardware and its corresponding door or drawer as you remove them.
- Why: This ensures easy reassembly and keeps everything organized, saving you time and frustration.
- How: Use masking tape and a marker to label each piece. For example, label the door and its hinges with the same number or code.
Create a Dust-Free Environment
- Tip: Minimize dust in your painting area to prevent it from settling on wet paint.
- Why: Dust can ruin a smooth finish, making your painted cabinets look less professional.
- How: Clean the area thoroughly before starting and use a damp cloth to wipe down surfaces. Consider using a portable air purifier to keep the air clean while painting.
Practice Patience with Drying and Curing
- Tip: Allow adequate time for drying and curing between coats and before reassembly.
- Why: Proper drying and curing times are crucial for a durable finish that won’t chip or peel.
- How: Follow the manufacturer’s instructions for drying times. Typically, it’s 24 hours between coats and several days to a week for full curing before reattaching hardware and using the cabinets.
By incorporating these tips, you’ll ensure your painting kitchen cabinets project yields the best possible results. Whether you’re looking to repaint cabinets or start a new cabinet painting project, these expert tips will help you achieve a beautiful, long-lasting finish.
Troubleshooting Common Issues
Even with careful preparation and execution, you might encounter some common issues while painting kitchen cabinets. Here’s how to address them effectively to ensure your cabinet painting project is a success.
-
Paint Not Adhering Properly
- Cause: Surface not properly prepared.
- Solution: Ensure all surfaces are thoroughly cleaned, sanded, and primed. Grease and grime can prevent paint from sticking, so cleaning with a mild detergent is crucial. Sanding and using a high-quality primer create a surface that kitchen cabinet paint can adhere to.
-
Brush Marks
- Cause: Using the wrong brush or applying paint too thickly.
- Solution: Use high-quality brushes and apply paint in thin, even coats. Adding a paint conditioner like Floetrol can help reduce brush marks by improving the paint’s flow.
-
Bubbles in the Paint
- Cause: Applying paint too quickly or over a wet surface.
- Solution: Ensure each coat is fully dry before applying the next one. Apply paint slowly and evenly to avoid trapping air bubbles. Sand lightly between coats to smooth out any imperfections.
-
Peeling Paint
- Cause: Poor surface preparation or using incompatible paint types.
- Solution: Remove peeling paint by sanding the affected areas. Clean thoroughly and apply a primer suited for the surface. Make sure to choose high-quality paint that is compatible with the primer.
-
Streaky Finish
- Cause: Uneven application of paint.
- Solution: Apply paint in thin, even coats using a high-quality brush or roller. Use long, smooth strokes, and avoid going over areas that have already started to dry. Sand lightly between coats and clean off dust with a tack cloth.
-
Drips and Sags
- Cause: Applying too much paint at once.
- Solution: Apply paint in thin layers and don’t overload your brush or roller. If you notice drips or sags, smooth them out immediately with your brush or roller before they dry. Sand and reapply if necessary.
-
Uneven Coverage
- Cause: Not using enough coats of paint.
- Solution: Ensure that you apply at least two coats of paint, allowing sufficient drying time between each coat. Tinted primer can help improve coverage and reduce the number of paint coats needed.
-
Cracking Paint
- Cause: Paint applied too thickly or over a wet surface.
- Solution: Sand down the affected area to smooth it out. Clean thoroughly and apply a primer before repainting with thin, even coats. Allow each coat to dry completely before applying the next.
By addressing these common issues with the right techniques and tools, you can ensure that your painting kitchen cabinets project turns out beautifully. Proper preparation, using high-quality materials, and following best practices for painting cabinets will help you achieve a smooth, durable, and professional-looking finish.
Final Advice
- Take Your Time: Don’t rush through the process. Taking your time with each phase, especially preparation, will yield the best results.
- Invest in Quality Materials: Using high-quality paint, brushes, rollers, and other materials will make a significant difference in the durability and appearance of your cabinets.
If you find the process of how to paint cabinets that are already painted daunting or simply prefer to leave it to professionals, consider contacting Prep Smart. At Prep Smart, we are experts in Cabinet Refinishing or painting and can help you achieve a flawless finish with minimal hassle. Our team uses the best techniques and materials to ensure your painted cabinets look stunning and last for years. Let Prep Smart Painting take the stress out of your cabinet painting project, so you can enjoy beautifully refreshed cabinets without lifting a finger.