How to Remove Mold from Walls
Table of Contents
Health risks associated with mold
Exposure to mold can lead to a variety of health issues. The severity of these health risks depends on the extent of mold growth, the type of mold present, and an individual’s sensitivity to mold. Common health problems associated with mold exposure include:
- Allergic Reactions: Symptoms such as sneezing, runny nose, red eyes, and skin rash are common among individuals who are allergic to mold spores.
- Asthma Attacks: Mold exposure can trigger asthma attacks in people who have asthma. It can also increase the risk of developing asthma in children.
- Respiratory Issues: Prolonged exposure to mold can cause or worsen respiratory conditions, including chronic bronchitis and other lung infections.
- Mycotoxicosis: Some molds produce mycotoxins, which can cause more severe health problems, such as immune suppression and, in extreme cases, cancer.
The health risks are particularly significant for vulnerable populations, such as infants, elderly individuals, people with compromised immune systems, and those with pre-existing respiratory conditions. Understanding How to Remove Mold from Walls can help mitigate these risks.
Overview of the removal process
The process of mold removal involves several critical steps to ensure that the mold is completely eradicated and does not return. You must know how to eliminate mold on walls and how to clean mold off walls as these are critical aspects of this process. Here is a scientific overview of the mold removal process:
- Assessment and Identification: The first step is to identify the extent of the mold infestation and the type of mold present. This often involves a thorough inspection of the affected areas and may include testing air and surface samples for mold spores.
- Containment: To prevent the spread of mold spores to unaffected areas, it is essential to contain the moldy area. This can be done using plastic sheeting and tape to seal off the space, as well as employing air filtration systems.
- Removal: The actual removal of mold involves cleaning and disinfecting the affected surfaces. Depending on the severity of the infestation, this can range from wiping down surfaces with a mold-killing solution to removing and disposing of contaminated materials like drywall or carpeting. Knowing how to remove mold from walls and understanding the process are critical aspects of this task.
- Drying: Mold thrives in moist environments, so it is crucial to thoroughly dry the affected area to prevent re-growth. This may involve using dehumidifiers, fans, and other drying equipment.
- Repair and Restoration: After the mold has been removed and the area dried, any damaged materials need to be repaired or replaced. This can include painting, replacing drywall, or installing new insulation.
- Prevention: The final step involves taking measures to prevent mold from returning. This includes controlling humidity levels, fixing leaks, improving ventilation, and regularly inspecting areas prone to mold growth. Learning how to remove mold from walls effectively ensures it won’t return.
By following these steps, you can effectively remove mold from your home and reduce the risk of health problems associated with mold exposure.
Understanding Mold
What is mold?
Mold is a type of fungus that consists of small organisms found almost everywhere. Molds are part of the natural environment and play a crucial role in nature by breaking down dead organic matter such as fallen leaves and dead trees. Mold grows by releasing tiny spores that float through the air and settle on surfaces. When these spores land on damp or decaying material, they begin to grow and form colonies. Mold reproduces through these spores, which can be harmful when inhaled in large quantities.
Common causes of mold on walls
How to get rid of mold on walls involves addressing these moisture sources. Mold growth on walls is typically the result of excess moisture, which can come from various sources:
- Humidity: High indoor humidity levels can create the perfect environment for mold growth.
- Leaks: Water leaks from pipes, roofs, or windows can introduce moisture into walls.
- Condensation: Poor insulation can lead to condensation on walls, providing a damp surface for mold to grow.
- Flooding: Water damage from flooding can leave walls damp for extended periods, promoting mold growth.
- Poor Ventilation: Inadequate airflow can trap moisture, especially in bathrooms, kitchens, and basements.
Understanding how to remove mold from walls involves addressing these moisture sources effectively.
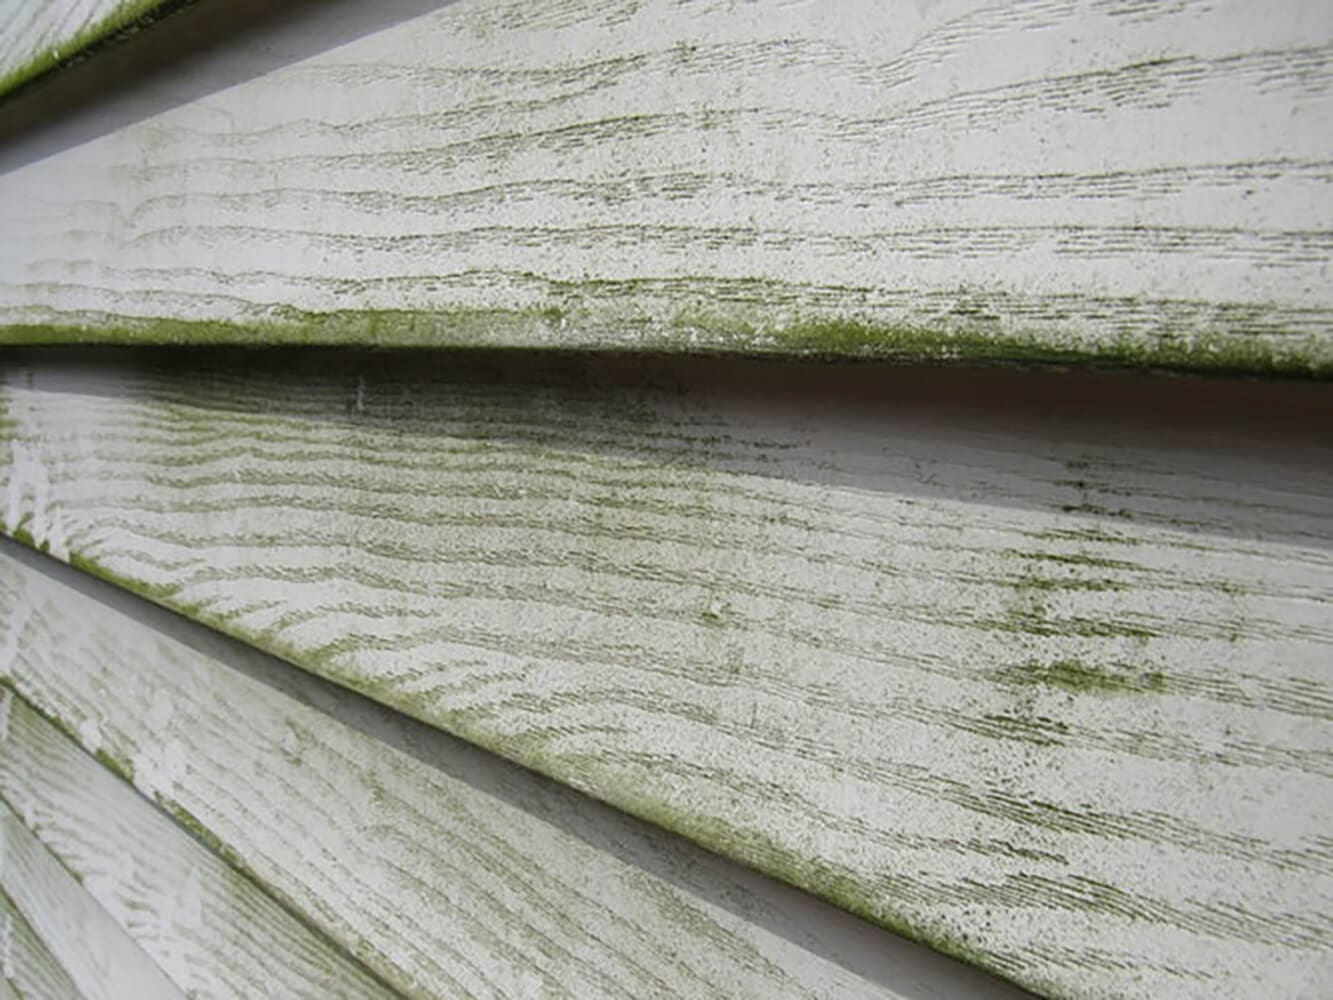
Identifying mold: visual signs and smells
If you want to know how to remove mold from walls you should first know about the visual signs like black or green spots
|
Visual Signs |
Smells |
|
Black or green spots |
Musty, earthy smell |
|
White, fuzzy patches |
Damp, stale odor |
|
Orange or pink hues (in bathrooms) |
Pungent, decaying smell |
|
Streaks or stains on walls |
Persistent, lingering smell |
If you notice these signs, it’s essential to know how to remove mold from walls effectively.
Different types of mold commonly found indoors
|
Type of Mold |
Description |
Health Risks |
|
Aspergillus |
Common indoor mold, often found in dust, on food, and in air conditioning systems. |
Allergic reactions, respiratory infections. |
|
Cladosporium |
Black or green mold that can grow on painted surfaces, under carpets, and in damp areas. |
Allergic reactions, asthma attacks. |
|
Stachybotrys (Black Mold) |
Dark black or greenish mold that grows on materials with high cellulose content, like wood, paper, and drywall. |
Severe respiratory issues, toxic effects, mycotoxicosis. |
|
Penicillium |
Blue or green mold that grows on food, insulation, and water-damaged buildings. |
Allergic reactions, respiratory issues. |
|
Alternaria |
Dark brown or green mold that is commonly found in showers, sinks, and around windows. |
Allergic reactions, asthma attacks, and hypersensitivity. |
Understanding these aspects of mold helps in identifying and addressing mold issues effectively, preventing health risks and structural damage to buildings. Black mold removal is crucial for Stachybotrys (Black Mold).Using a black mold remover and black mold cleaner can be effective for treating black mold
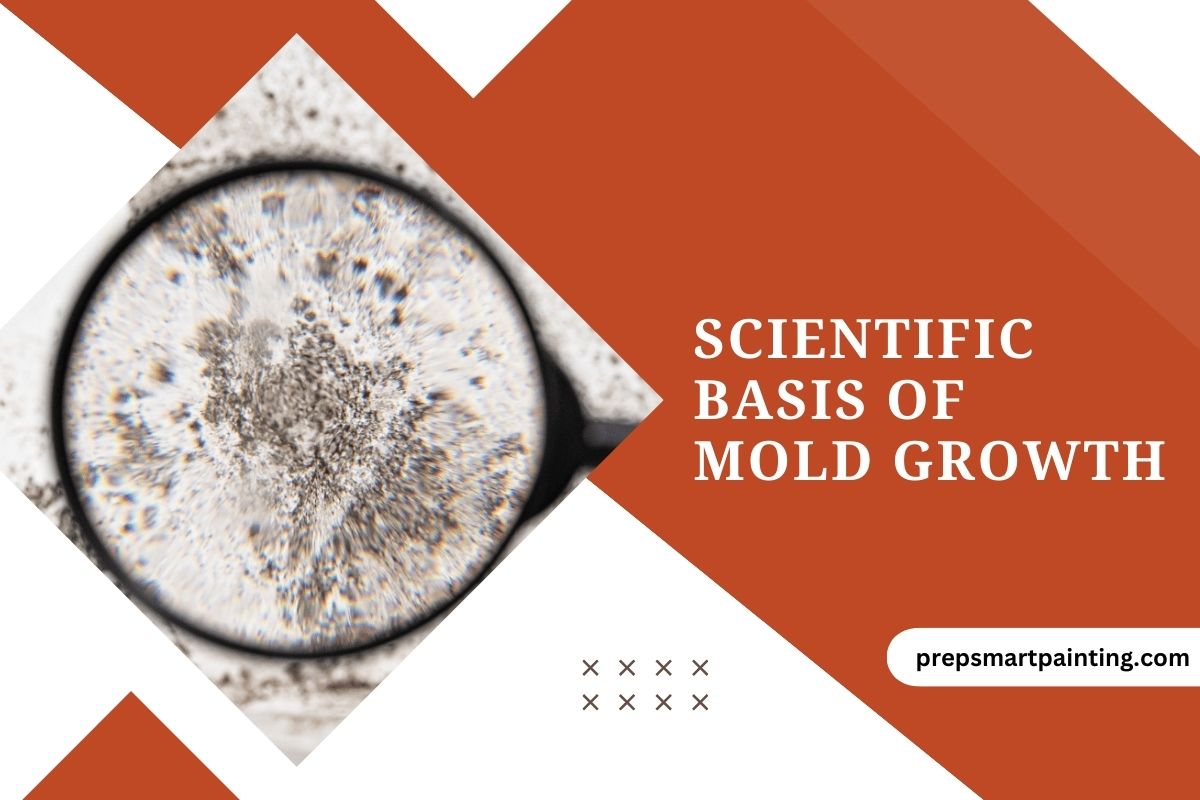
Scientific Basis of Mold Growth
Conditions that promote mold growth
Understanding how to remove fungus from wall helps prevent mold growth.Mold requires specific conditions to thrive. The key factors that promote mold growth include:
- Moisture: Mold needs moisture to grow. This can come from leaks, flooding, condensation, or high humidity levels.
- Nutrient Source: Mold feeds on organic materials such as wood, paper, drywall, and fabrics.
- Temperature: Most molds grow best in warm environments, typically between 77°F and 86°F (25°C to 30°C), though some can thrive in cooler or hotter conditions.
- Oxygen: Like most organisms, mold requires oxygen to grow.
- Darkness: Mold tends to grow in darker environments as UV light can inhibit its growth.
The lifecycle of mold
The lifecycle of mold involves several stages:
- Spore Formation: Mold begins as spores, which are microscopic particles that are released into the air.
- Spore Germination: When spores land on a moist surface, they absorb water and begin to germinate, forming new mold cells.
- Hyphal Growth: The germinated spores develop hyphae, which are thread-like structures that spread across the surface and penetrate the substrate.
- Colony Formation: As hyphae grow and intertwine, they form a visible colony. This colony produces more spores, continuing the cycle.
- Spore Release: Mature mold colonies release new spores into the air, which can spread to other areas and start new colonies.
How mold spreads through a home
Mold spreads through a home primarily by releasing spores into the air. These spores can be transported by air currents, people, pets, and objects. Here’s how mold typically spreads:
- Airborne Spores: Mold spores are lightweight and can travel through the air, spreading throughout the home via air ducts, fans, and open windows.
- Direct Contact: Spores can attach to clothing, shoes, and pets, allowing them to be carried from one area to another.
- Water Intrusion: Leaks and flooding can carry mold spores to different parts of the home. Water also provides the moisture needed for spores to germinate and grow.
- Condensation: Inadequate insulation and poor ventilation can lead to condensation on walls and ceilings, creating damp surfaces for mold to grow and spread.
- Poor Ventilation: Areas with poor airflow, such as basements and bathrooms, can trap moisture and spores, facilitating mold growth.
How to get rid of mildew is important for preventing mold spread.By understanding the scientific basis of mold growth, including the conditions it needs, its lifecycle, and how it spreads, homeowners can take more effective measures to prevent and control mold in their homes.
Preparing for Mold Removal
Safety precautions: wearing protective gear (gloves, masks, goggles)
When removing mold, it’s crucial to take safety precautions to protect yourself from exposure to mold spores and potentially harmful cleaning chemicals. Knowing how do you get rid of mold safely involves using protective gear.
- Gloves: Wear rubber or nitrile gloves to protect your skin from direct contact with mold and cleaning agents. Mold can cause skin irritation and allergic reactions, and some cleaning chemicals can be corrosive.
- Masks: Use an N95 respirator mask to prevent inhaling mold spores. Mold spores are microscopic and can easily become airborne during cleaning, posing respiratory health risks such as allergic reactions and asthma attacks.
- Goggles: Wear safety goggles to protect your eyes from mold spores and cleaning solutions. Mold spores can irritate the eyes, and splashes from cleaning agents can cause severe eye damage.
Tools and materials needed: cleaning solutions, brushes, cloths, etc.
Having the right tools and materials is essential for effective mold removal:
- Cleaning Solutions: Different cleaning solutions can be used depending on the severity of the mold. Vinegar and hydrogen peroxide are effective for small mold infestations, while bleach or commercial mold removers are suitable for larger areas. Vinegar is acidic and can kill 82% of mold species, while hydrogen peroxide is a strong oxidizer that can break down mold spores.
- Brushes: Use stiff-bristled brushes to scrub mold off surfaces. Brushes help physically remove mold colonies from porous surfaces like wood and drywall.
- Cloths and Sponges: Microfiber cloths and sponges can be used to wipe down and rinse surfaces after scrubbing. Microfiber is effective at trapping mold spores and preventing them from becoming airborne.
- Buckets: Use buckets for mixing cleaning solutions and rinsing cloths and sponges.
Ventilating the area: importance of fresh air circulation
Proper ventilation is crucial during mold removal for several reasons. How do you remove mold includes proper ventilation techniques:
- Reduces Mold Spore Concentration: Ventilating the area helps disperse airborne mold spores, reducing their concentration and minimizing inhalation risks.
- Evaporates Moisture: Good airflow aids in drying damp areas, making the environment less favorable for mold growth. Mold requires moisture to thrive, so reducing humidity levels is key to preventing re-growth.
- Improves Air Quality: Ventilation helps remove volatile organic compounds (VOCs) released from cleaning solutions, improving indoor air quality.
Ensure windows are open and use fans or air purifiers to maintain airflow while cleaning.
Testing for mold: when and how to test for mold types
Testing for mold is important to determine the type and extent of mold contamination. If unsure how can I remove mold, professional testing can help. Here’s how and when to test for mold:
-
When to Test:
Visible Mold: If you can see mold growing, testing can identify the specific type, which is useful if you need to understand the potential health risks.
Musty Odor: A persistent musty smell indicates hidden mold, often behind walls or under floors. Testing can confirm mold presence.
Health Symptoms: If occupants experience unexplained allergic reactions, respiratory issues, or other health problems, mold testing can identify if mold is the cause.
Post-Remediation: After mold removal, testing ensures that the cleanup was effective and no mold remains.
-
How to Test:
DIY Mold Test Kits: These kits allow you to collect samples from surfaces or the air. Samples are then sent to a lab for analysis. This is a cost-effective option but may not be as accurate as professional testing.
Professional Mold Inspection: Hiring a professional mold inspector provides a thorough assessment using advanced equipment like moisture meters, thermal imaging cameras, and air quality monitors. Professionals can identify hidden mold, measure spore levels, and provide detailed reports.
Testing helps in understanding the severity and type of mold, allowing for appropriate removal methods and health risk mitigation.
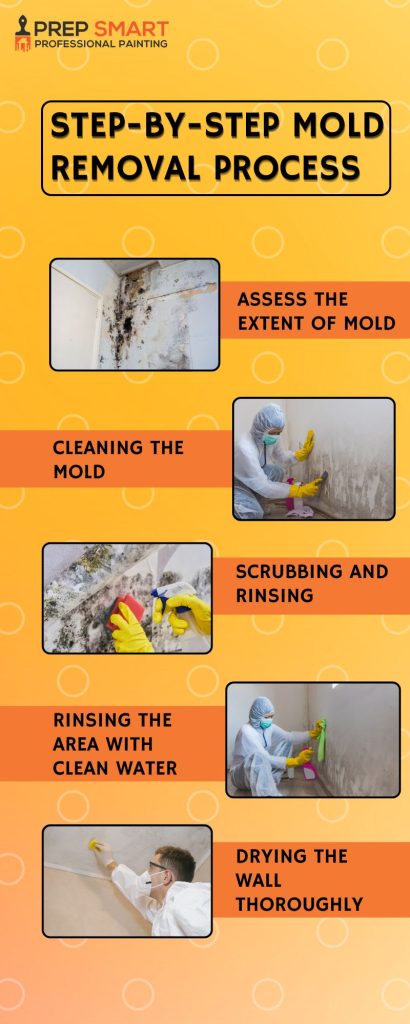
Step 1: Assess the Extent of Mold
Inspecting the affected area is crucial to determine the extent of mold growth and plan for removal. For specific areas like bathrooms, knowing how to remove mold from bathroom ceiling is essential.
Visual Inspection
Conduct a thorough visual inspection of the suspected area. Here’s how you can do this step-by-step:
- Look for Discoloration: Identify any unusual discoloration on walls, ceilings, floors, and around windows or plumbing fixtures. Mold can appear in various colors including black, green, white, and orange.
- Check Common Mold Hotspots: Focus on areas with high humidity or moisture. Bathrooms, kitchens, basements, and areas around windows are common hotspots. Also, check behind furniture or appliances where mold can grow unnoticed.
- Use a Flashlight: Mold can hide in dark corners or under furniture. Use a flashlight to inspect these areas thoroughly.
- Feel for Moisture: Mold thrives in damp environments. Use your hand to feel for dampness on walls or surfaces. A moisture meter can also help identify damp spots that might not show visible mold but are conducive to mold growth.
Smell Test
Mold often emits a musty, earthy smell. Walk around the suspected areas and note any strong, musty odors, which can indicate hidden mold.
Surface Testing
For a more detailed assessment, perform surface testing. This involves taking samples from suspicious areas using swabs or tape lifts and analyzing them for mold spores. Here’s how:
- Swab Test: Use a sterile swab to collect samples from visible mold patches. Place the swab in a sealed bag for laboratory analysis.
- Tape Lift: Use clear adhesive tape to lift mold samples from surfaces. Stick the tape to a microscope slide or a sealed bag for analysis.
Determining the severity of the infestation
Area Size
- Small Infestations: If mold covers less than 10 square feet (e.g., a small patch on a wall), it is generally manageable with DIY methods.
- Moderate Infestations: If mold covers between 10 and 100 square feet, you might need more intensive cleaning and possibly professional advice.
- Large Infestations: If mold covers over 100 square feet or is widespread across multiple areas, professional mold remediation is recommended due to potential health risks and structural damage.
Depth of Penetration
- Surface Mold: Mold growing on the surface of walls or other materials is generally easier to clean. This can often be wiped away with appropriate cleaning solutions.
- Embedded Mold: Mold that has penetrated porous materials like drywall, wood, or insulation is harder to remove and may require replacing the affected materials.
Type of Mold
To determine the type of mold, use visual clues and consider professional testing:
-
Visual Clues
- Black Mold (Stachybotrys chartarum): Often appears as black or dark green slimy patches. It usually grows on materials with high cellulose content, such as wood, paper, and drywall, especially in areas with prolonged moisture.
- Green Mold (Aspergillus, Penicillium): Appears as green, powdery or fuzzy patches. Often found on food, walls, and damp areas.
- White Mold (Cladosporium): Can appear as white or pale green patches. Often grows on wood, painted surfaces, and other moist areas.
- Orange Mold: Usually appears in bathrooms and kitchens as slimy, orange patches, often indicating the presence of more than one mold species.
-
Professional Testing
- Mold Test Kits: These kits allow you to collect samples from surfaces or the air. Samples are then sent to a lab for analysis. While cost-effective, they may not be as accurate as professional testing.
- Professional Mold Inspection: Hiring a professional mold inspector provides a thorough assessment using advanced equipment like moisture meters, thermal imaging cameras, and air quality monitors. Professionals can identify hidden mold, measure spore levels, and provide detailed reports.
Structural Damage
Check for signs of structural damage caused by mold. This can include:
- Rotting Wood: Mold can weaken wood structures, leading to rot and decay.
- Crumbling Drywall: Mold can cause drywall to deteriorate, becoming soft or crumbly.
- Damaged Insulation: Mold can grow within insulation, reducing its effectiveness and leading to health risks.
By following these steps, you can accurately assess the extent of mold infestation, identify the type of mold, and determine the severity of the problem, allowing you to take the appropriate remediation steps
Step 2: Cleaning the Mold
Choosing the right cleaning solution is crucial. Understanding what kills mold permanently and knowing does bleach kill mold or can bleach kill mold can guide your cleaning method. Considering methods for how to kill black mold and what kills black mold ensures effective treatment. Specific areas like bathrooms require knowledge of how to remove mold from shower and how to clean mold off walls for thorough cleaning.
Choosing the right cleaning solution
Selecting the appropriate cleaning solution is crucial for effective mold removal. Here are some common options, along with their benefits and drawbacks:
-
Vinegar
- Why Use It: Vinegar is mildly acidic and can kill about 82% of mold species.
- How to Use: Pour undiluted white vinegar into a spray bottle.
- Advantages: Non-toxic, eco-friendly, safe for use around pets and children.
- Drawbacks: May not be effective against all types of mold.
-
Bleach
- Why Use It: Bleach is a powerful disinfectant that can kill mold on non-porous surfaces.
- How to Use: Mix one cup of bleach with one gallon of water.
- Advantages: Kills mold and mold spores, disinfects surfaces.
- Drawbacks: Toxic fumes, can cause skin and eye irritation, not effective on porous materials as it doesn’t penetrate deeply.
-
Hydrogen Peroxide
- Why Use It: Hydrogen peroxide is an antifungal, antiviral, and antibacterial solution.
- How to Use: Pour 3% hydrogen peroxide into a spray bottle and apply directly to the moldy area.
- Advantages: Non-toxic, effective against a variety of mold species.
- Drawbacks: Can bleach certain materials, should be used with care on colored surfaces.
-
Commercial Mold Removers
- Why Use Them: Formulated specifically to kill mold and mildew.
- Examples: Some reputable brands include Concrobium Mold Control, RMR-86 Instant Mold & Mildew Stain Remover, and Mold Armor FG500.
- How to Use:
- Concrobium Mold Control: Spray directly onto the affected area and let it dry. This solution works by crushing mold spores as it dries, leaving behind an invisible antimicrobial barrier to prevent future growth. No scrubbing or rinsing required.
- RMR-86 Instant Mold & Mildew Stain Remover: Spray generously onto the moldy surface and watch the stains disappear in 15 seconds. Wipe away any excess liquid with a cloth. No scrubbing is needed for light infestations.
- Mold Armor FG500: Spray directly onto the moldy area and wait for 10 minutes. Scrub the surface with a brush if necessary, then rinse with clean water and dry the area thoroughly.
Preparing the cleaning solution
Preparation is key to ensuring the cleaning solution is effective. Here’s how to prepare each solution:
-
Vinegar Solution
- Pour undiluted white vinegar into a spray bottle. No need to dilute it with water, as full-strength vinegar is more effective against mold.
-
Bleach Solution
- Mix one cup (240 ml) of bleach with one gallon (3.8 liters) of water in a bucket. Use gloves to protect your hands while mixing.
-
Hydrogen Peroxide Solution
- Pour 3% hydrogen peroxide into a spray bottle. Hydrogen peroxide is usually sold at this concentration, so no dilution is needed.
-
Commercial Mold Remover
- Follow the specific instructions provided on the product label. Generally, these come ready to use or require minimal preparation.
Applying the solution to the moldy area
Once your cleaning solution is prepared, apply it to the moldy area following these steps:
-
Vinegar
- Spray the vinegar directly onto the moldy surface.
- Let it sit for at least an hour to penetrate and kill the mold.
- Wipe the area with a damp cloth to remove any remaining mold and vinegar residue.
-
Bleach
- Apply the bleach solution using a spray bottle or a sponge.
- Allow it to sit on the moldy area for about 15 minutes.
- Scrub the area with a brush to remove the mold.
- Rinse the area thoroughly with clean water and dry it completely to prevent future mold growth.
-
Hydrogen Peroxide
- Spray the hydrogen peroxide directly onto the mold.
- Let it sit for about 10 minutes.
- Scrub the area to remove mold and disinfect the surface.
- Wipe down the area with a damp cloth and dry it thoroughly.
-
Commercial Mold Remover
- Concrobium Mold Control: Spray the solution directly onto the affected area and let it dry. The solution works by crushing mold spores as it dries, leaving an invisible antimicrobial barrier to prevent future growth. No scrubbing or rinsing is required.
- RMR-86 Instant Mold & Mildew Stain Remover: Spray generously onto the moldy surface and watch the stains disappear in 15 seconds. Wipe away any excess liquid with a cloth. No scrubbing is needed for light infestations.
- Mold Armor FG500: Spray directly onto the moldy area and wait for 10 minutes. Scrub the surface with a brush if necessary, then rinse with clean water and dry the area thoroughly.
By choosing the right cleaning solution and applying it correctly, you can effectively eliminate mold from your home and reduce the risk of it returning. Proper preparation and application ensure the cleaning process is thorough and safe.
Step 3: Scrubbing and Rinsing
Proper scrubbing techniques are essential for effectively removing mold from walls.
Proper scrubbing techniques
Proper scrubbing is essential to effectively remove mold and prevent its recurrence. Here’s how to scrub mold-infested areas:
- Choose the Right Brush: Use a stiff-bristled brush for scrubbing. The bristles should be firm enough to remove mold but not so hard that they damage the surface.
- Scrub Gently but Firmly: Apply moderate pressure to avoid damaging the surface. Use circular motions to dislodge mold from porous surfaces like wood and drywall.
- Work in Small Sections: Focus on one small section at a time to ensure thorough cleaning. This also prevents spreading mold spores to other areas.
- Reapply Cleaning Solution as Needed: If the mold is particularly stubborn, reapply the cleaning solution and continue scrubbing until the mold is removed.
Rinsing the area with clean water
After scrubbing, it’s important to rinse the area to remove any residual mold and cleaning solution:
- Use Clean Water: Rinse the area with clean, lukewarm water. Using clean water ensures that no new contaminants are introduced.
- Use a Clean Cloth or Sponge: Dampen a cloth or sponge in clean water and wipe down the scrubbed area. Ensure you rinse the cloth or sponge frequently to avoid reapplying mold or cleaning solution residue.
- Ensure Thorough Rinsing: Make sure to remove all traces of the cleaning solution, as leftover chemicals can cause damage to surfaces or irritate skin upon contact.
Drying the wall thoroughly
Proper drying is crucial to prevent mold from returning. Here’s how to dry the wall effectively:
- Use Towels or Absorbent Cloths: Pat the area dry with clean, dry towels or absorbent cloths. This helps remove the bulk of the moisture.
- Utilize Fans and Dehumidifiers: Place fans around the cleaned area to increase air circulation. A dehumidifier can also help reduce humidity levels, speeding up the drying process.
- Ensure Complete Drying: Leave the fans and dehumidifiers running until the area is completely dry. Check for any remaining dampness, as even small amounts of moisture can encourage mold growth.
- Improve Ventilation: If possible, open windows and doors to improve airflow and further aid in drying the area. Good ventilation helps maintain lower humidity levels and prevents future mold growth.
By following these steps for scrubbing, rinsing, and drying, you can ensure that the mold is completely removed and the area is properly cleaned and dried, reducing the risk of mold reoccurrence.
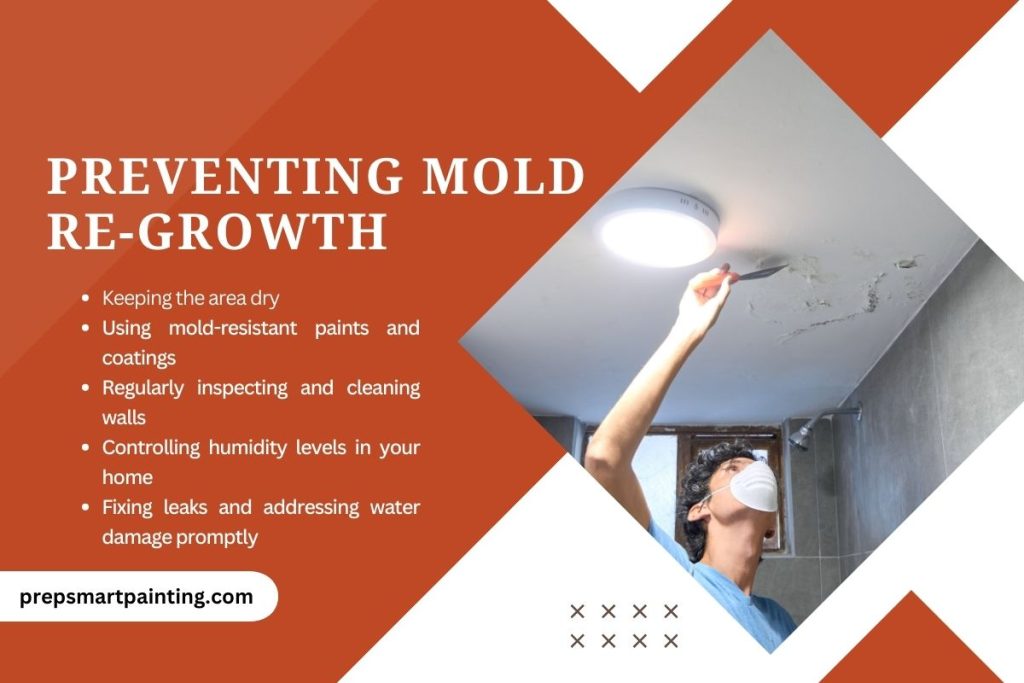
Preventing Mold Re-growth
Keeping the area dry: tips for maintaining dryness
Preventing mold re-growth primarily involves keeping your home dry. Here are some tips:
- Improve Ventilation: Use exhaust fans in bathrooms, kitchens, and laundry rooms to remove moisture from the air. Keep windows open when possible to increase airflow.
- Use Dehumidifiers: Place dehumidifiers in damp areas like basements to reduce humidity levels. Aim to keep indoor humidity below 60%, ideally between 30-50%.
- Dry Wet Areas Immediately: After spills or leaks, dry the area thoroughly within 24-48 hours. Use towels, fans, and dehumidifiers to speed up the drying process.
- Monitor Indoor Plants: Overwatering houseplants can increase indoor humidity. Use well-draining pots and avoid letting water sit in saucers.
Using mold-resistant paints and coatings
Applying mold-resistant paints and coatings can help prevent mold growth on walls and other surfaces. Understanding whether does bleach kill black mold helps to understand the limitations of bleach.
- Mold-Resistant Paints: These paints contain antimicrobial agents that inhibit mold growth. Use them in high-moisture areas such as bathrooms and basements. Brands like Zinsser Mold Killing Primer and BEHR Premium Plus Ultra are effective options.
- Waterproof Coatings: Apply waterproof coatings to surfaces prone to moisture, such as basement walls. Products like Drylok Masonry Waterproofer can help keep moisture out and prevent mold growth.
- Regular Maintenance: Reapply mold-resistant paints and coatings every few years, or as recommended by the manufacturer, to maintain their effectiveness.
Regularly inspecting and cleaning walls
Regular inspection and cleaning can catch mold problems early. Knowing how to take out mold and how to clean off mold are part of regular maintenance to prevent mold growth.
- Monthly Inspections: Check walls, ceilings, and other areas for signs of moisture and mold. Pay particular attention to corners, behind furniture, and around windows and doors.
- Cleaning Routine: Clean walls and surfaces with mold-inhibiting cleaners or a vinegar solution regularly. This is especially important in high-moisture areas like bathrooms and kitchens.Knowing how to remove mold from bathroom is crucial when facing complex mold issues.
- Use Mold-Preventive Solutions: When cleaning, use solutions that prevent mold growth. A mixture of water and vinegar (1:1 ratio) can be effective.
Controlling humidity levels in your home
Maintaining optimal humidity levels is crucial for mold prevention. How to get rid of mildew is a key aspect of humidity control.
- Use Humidity Monitors: Place hygrometers in various rooms to monitor humidity levels. Adjust the use of dehumidifiers and ventilation accordingly.
- Ventilation Systems: Ensure your home’s ventilation system is functioning properly. This includes exhaust fans, HVAC systems, and attic vents.
- Climate Control: Use air conditioners and heaters to control indoor climate, preventing excess humidity in summer and dampness in winter.
Fixing leaks and addressing water damage promptly
Addressing water issues quickly can prevent mold from taking hold. Considering can I clean mold with bleach is important when addressing water damage.
- Regular Plumbing Checks: Inspect plumbing fixtures, pipes, and appliances for leaks. Fix any leaks immediately to prevent water accumulation.
- Roof and Gutter Maintenance: Keep gutters clean and ensure they direct water away from your home. Inspect your roof for damage and repair it promptly.
- Basement and Foundation: Check your basement and foundation for cracks or water seepage. Seal cracks and ensure proper drainage around your foundation.
- Water Damage Response: In the event of water damage from flooding or leaks, dry the area thoroughly within 24-48 hours. Use fans, dehumidifiers, and professional drying services if necessary.
By implementing these measures, you can effectively prevent mold re-growth in your home, maintaining a healthy and mold-free environment.
What to Avoid?
Common mistakes in mold removal
Inadequate Safety Precautions
- Why It’s Important: Mold spores can cause respiratory issues, skin irritation, and eye irritation. Mold exposure is especially harmful to people with allergies, asthma, or weakened immune systems.
- What to Do: Always wear protective gear, including gloves, an N95 respirator mask, and safety goggles, to prevent exposure to mold spores and cleaning chemicals. This reduces the risk of inhaling spores and having direct contact with mold, which can lead to health problems.
Skipping Containment
- Why It’s Important: Without proper containment, mold spores can spread to other areas of the house, leading to new infestations.
- What to Do: Seal off the affected area with plastic sheeting and tape to prevent mold spores from contaminating other spaces. This localized containment minimizes the spread and makes cleanup more manageable.
Superficial Cleaning
- Why It’s Important: Cleaning only the visible mold without addressing the underlying moisture issue will not eliminate the problem. Mold will regrow if the source of moisture is not fixed.
- What to Do: Identify and repair the source of moisture (e.g., leaks, condensation) before cleaning the mold. This ensures that once the mold is removed, it will not return due to lingering moisture problems.
Using the wrong cleaning agents
Ammonia
- Why It’s Ineffective: Ammonia can kill mold on non-porous surfaces but does not penetrate porous materials like wood or drywall. Mixing ammonia with bleach produces toxic fumes.
- What to Use Instead: Use vinegar or hydrogen peroxide for porous surfaces, as these solutions penetrate deeper and are more effective at killing mold roots. For non-porous surfaces, bleach can be effective.
Bleach on Porous Materials
- Why It’s Ineffective: Bleach only kills surface mold on porous materials and does not reach mold roots. This can result in mold regrowth.
- What to Use Instead: Use specialized mold cleaners or a combination of vinegar and hydrogen peroxide, which can penetrate porous materials and kill mold more effectively.
Homemade Remedies with Limited Efficacy
- Why It’s Ineffective: Some homemade solutions may not be strong enough to eradicate mold, especially in severe cases.
- What to Use Instead: Use commercial mold removers that are designed to tackle severe mold infestations. These products are specifically formulated to be effective against mold and mildew.
Ignoring small mold patches
Growth Potential
- Why It’s Important: Small mold patches can spread rapidly under favorable conditions. Mold spores can travel through the air and settle in other areas.
- What to Do: Address small mold patches immediately to prevent them from spreading. Early intervention can stop mold from becoming a larger issue.
Health Risks
- Why It’s Important: Even small amounts of mold can release spores that cause allergic reactions and respiratory problems.
- What to Do: Clean small mold patches as soon as they are noticed and use a mold-inhibiting cleaner to ensure all spores are killed. This helps maintain air quality and reduces health risks.
Preventative Action
- Why It’s Important: Early intervention can prevent more extensive damage and more costly repairs.
- What to Do: Regularly inspect areas prone to moisture, and clean any small mold patches immediately. This proactive approach prevents minor issues from escalating.
Missteps in Drying the Affected Area
Proper drying is crucial to prevent mold re-growth. Knowing will bleach kill mold is a common question during drying steps.
Inadequate Drying Time
- Why It’s Important: Not allowing enough time for the area to dry completely can leave moisture behind, promoting mold growth.
- What to Do: Ensure the area is thoroughly dry before considering the job complete. Use fans, dehumidifiers, and keep windows open to aid in drying.
Lack of Ventilation
- Why It’s Important: Poor ventilation can trap moisture, leading to mold growth.
- What to Do: Use exhaust fans, dehumidifiers, and open windows to improve airflow. Proper ventilation helps remove moisture from the air, preventing mold growth.
Neglecting Hidden Moisture
- Why It’s Important: Mold can grow in hidden areas, such as inside walls or under flooring, where moisture lingers.
- What to Do: Use moisture meters to detect hidden dampness and dry these areas thoroughly. Ensure all hidden spaces are dry to prevent mold from growing unnoticed.
Using Ineffective Drying Equipment
- Why It’s Important: Household fans may not be powerful enough for severe moisture problems.
- What to Do: Consider renting professional-grade drying equipment for large or heavily affected areas. Professional equipment ensures thorough drying, reducing the risk of mold re-growth.
By avoiding these common mistakes and understanding the reasons behind these precautions, you can ensure a more effective and lasting solution to mold problems, maintaining a healthier living environment.
When to Call a Professional
Signs that professional help is needed
There are situations where professional mold remediation is necessary due to the complexity and severity of the infestation:
-
Large Infestations
- Why: If mold covers an area larger than 10 square feet, it’s often too extensive for DIY methods.
- How to Recognize: Visible mold growth spread across walls, ceilings, or multiple rooms indicates a large-scale problem.
-
Recurring Mold
- Why: Mold that returns shortly after cleaning suggests that underlying issues, such as hidden leaks or persistent humidity, are not being addressed.
- How to Recognize: Mold reappears in the same area despite repeated cleaning efforts.
-
Hidden Mold
- Why: Mold can grow behind walls, under floors, and in HVAC systems, areas that are difficult to inspect and clean without specialized equipment.
- How to Recognize: Persistent musty odors, unexplained health issues, or visible signs of water damage with no obvious mold.
-
Health Concerns
- Why: Exposure to mold can cause serious health issues, especially for those with allergies, asthma, or weakened immune systems.
- How to Recognize: Occupants experience ongoing respiratory problems, allergic reactions, or other health symptoms that improve when away from the home.
Benefits of hiring mold removal experts
Professional mold remediation offers several advantages over DIY methods:
-
Comprehensive Inspection
- Why: Professionals have the tools and expertise to conduct thorough inspections, identifying both visible and hidden mold.
- Benefit: Ensures all mold sources are located and addressed, preventing recurrence.
-
Effective Removal Techniques
- Why: Professionals use advanced techniques and equipment to remove mold safely and effectively.
- Benefit: Reduces the risk of mold spores spreading during the removal process and ensures complete eradication.
-
Moisture Control
- Why: Professionals can identify and repair underlying moisture problems that contribute to mold growth.
- Benefit: Addresses the root cause of mold issues, preventing future infestations.
-
Health Safety
- Why: Proper handling and disposal of mold and contaminated materials minimize health risks.
- Benefit: Protects the health of occupants, especially those who are vulnerable to mold-related health issues.
-
Preventive Measures
- Why: Experts can recommend and implement preventive measures to keep mold from returning.
- Benefit: Long-term protection against mold growth, ensuring a healthier living environment.
What to expect from professional mold remediation
When you hire a professional mold remediation service, you can expect a systematic and thorough approach to mold removal:
-
Assessment and Inspection
- Process: Professionals conduct a comprehensive inspection to assess the extent of mold growth and identify moisture sources.
- What to Expect: Detailed reports on the findings, including areas of mold infestation and recommendations for remediation.
-
Containment
- Process: The affected area is sealed off using plastic sheeting and negative air pressure to prevent mold spores from spreading.
- What to Expect: Reduced risk of mold contamination in other areas of the home.
-
Filtration
- Process: High-efficiency particulate air (HEPA) filters and air scrubbers are used to capture airborne mold spores.
- What to Expect: Cleaner air quality and reduced spore count in the home.
-
Mold Removal
- Process: Mold is removed from surfaces using specialized cleaning agents and equipment. Contaminated materials are disposed of safely.
- What to Expect: Thorough cleaning of affected areas, ensuring no mold remnants are left behind.
-
Drying and Dehumidification
- Process: Industrial-grade dehumidifiers and drying equipment are used to remove moisture from the area.
- What to Expect: Complete drying of the area to prevent mold re-growth.
-
Repairs and Restoration
- Process: Any structural damage caused by mold is repaired, and affected areas are restored to their original condition.
- What to Expect: A home that is free from mold and moisture issues, restored to a safe and habitable state.
What to expect from professional mold remediation
For homeowners dealing with mold infestations, Prep Smart Painting offers comprehensive mold remediation services to ensure your home is safe and mold-free. Here’s why you should consider Prep Smart Painting for your mold removal needs:
- Expertise: With years of experience, Prep Smart Painting’s professionals are equipped with the knowledge and tools to handle even the most severe mold problems.
- Thorough Inspections: They provide detailed inspections to identify all sources of mold and moisture, ensuring a comprehensive solution.
- Advanced Techniques: Utilizing the latest techniques and equipment, Prep Smart Painting ensures effective mold removal and prevents future growth.
- Health and Safety Focus: They prioritize your health and safety by using safe and effective mold removal methods, minimizing exposure to mold spores and chemicals.
- Quality Restoration: Prep Smart Painting not only removes mold but also restores your home to its original condition, ensuring it looks great and is structurally sound.
Choose Prep Smart Painting for reliable and professional mold remediation services. Their commitment to quality and customer satisfaction ensures your home remains a healthy and comfortable environment.
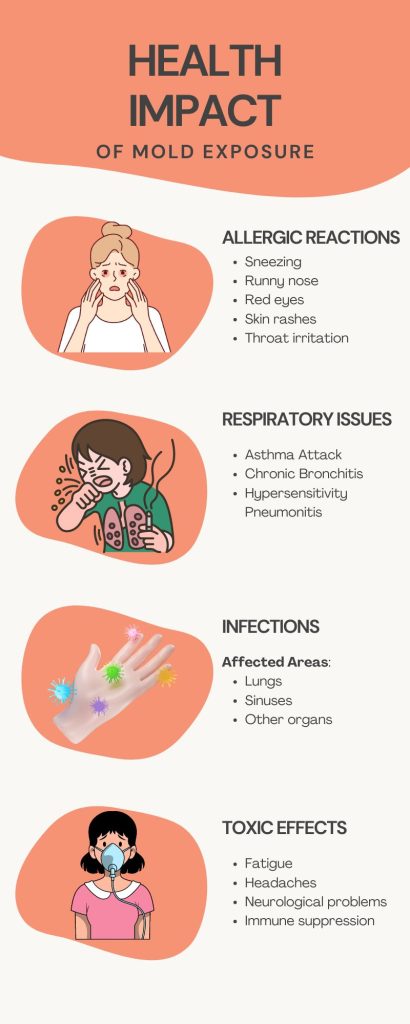
Health Impact of Mold Exposure
Detailed health effects of mold exposure
Mold exposure can lead to a range of health issues, varying in severity based on the extent of exposure and the individual’s sensitivity. Here are the main health effects:
- Allergic Reactions: Mold spores can trigger allergic reactions in sensitive individuals. Symptoms include sneezing, runny nose, red eyes, skin rashes, and throat irritation. These symptoms can be immediate or delayed after exposure.
- Respiratory Issues: Inhalation of mold spores can cause or exacerbate respiratory conditions. Common issues include:
- Asthma Attacks: Mold spores can trigger asthma attacks in individuals with asthma. Symptoms include wheezing, shortness of breath, and chest tightness.
- Chronic Bronchitis: Prolonged exposure to mold can lead to chronic bronchitis, characterized by persistent cough and mucus production.
- Hypersensitivity Pneumonitis: This is an inflammation of the lungs caused by an immune response to inhaled mold spores. Symptoms include cough, fever, and difficulty breathing.
- Infections: Certain types of mold, such as Aspergillus, can cause infections, particularly in individuals with weakened immune systems. These infections can range from mild to severe and may affect the lungs, sinuses, or other organs.
- Toxic Effects: Some molds, like Stachybotrys chartarum (black mold), produce mycotoxins, which are toxic compounds that can have severe health effects. Mycotoxicosis, caused by exposure to mycotoxins, can result in symptoms such as fatigue, headaches, neurological problems, and immune suppression.
Vulnerable populations: children, elderly, and people with respiratory conditions
Certain populations are more vulnerable to the effects of mold exposure due to their age, health status, or pre-existing conditions:
- Children: Children are particularly susceptible to mold-related health issues because their immune systems and respiratory systems are still developing. Exposure to mold can increase the risk of developing asthma and allergies. In homes with mold, children may experience more frequent respiratory infections and allergy symptoms.
- Elderly: The elderly are more likely to have weakened immune systems and pre-existing health conditions, making them more susceptible to mold-related illnesses. Mold exposure can exacerbate chronic respiratory conditions, increase the frequency of infections, and cause more severe allergic reactions.
- People with Respiratory Conditions: Individuals with asthma, chronic obstructive pulmonary disease (COPD), or other respiratory conditions are at higher risk for severe reactions to mold exposure. Mold spores can trigger asthma attacks, worsen COPD symptoms, and lead to chronic bronchitis. These individuals may experience more severe and prolonged symptoms compared to those without respiratory conditions.
Long-term effects of living with mold
Living in a mold-infested environment over an extended period can have significant long-term health consequences:
- Chronic Respiratory Problems: Long-term exposure to mold can lead to persistent respiratory issues, including chronic bronchitis, asthma, and hypersensitivity pneumonitis. These conditions can result in ongoing symptoms such as coughing, wheezing, and shortness of breath.
- Immune System Suppression: Continuous exposure to mold, particularly toxic molds like Stachybotrys chartarum, can suppress the immune system. This can make individuals more susceptible to infections and reduce their ability to fight off other illnesses.
- Neurological Symptoms: Mycotoxins produced by certain molds can affect the nervous system. Long-term exposure to these toxins can result in neurological symptoms such as headaches, memory loss, mood swings, and difficulty concentrating.
- Increased Allergy Sensitivity: Prolonged mold exposure can sensitize individuals to mold spores, leading to chronic allergic reactions. This can result in persistent symptoms like sneezing, nasal congestion, skin rashes, and itchy eyes, even with minimal exposure.
- Structural Health Risks: Living in a mold-infested home can also indirectly affect health by compromising the structural integrity of the building. Structural damage caused by mold can lead to unsafe living conditions, such as weakened floors and walls, increasing the risk of accidents and injuries.
By understanding the detailed health effects of mold exposure, identifying vulnerable populations, and recognizing the long-term consequences of living with mold, individuals can take proactive steps to mitigate risks and maintain a healthier living environment.
Frequently Asked Questions
How can I tell if I have a mold problem in my home?
Look for visible signs like black, green, or white spots on walls, ceilings, or floors. A persistent musty smell is another indicator of mold. If you or your family members experience unexplained allergy symptoms or respiratory issues, it might also be due to mold.
What should I do if I find mold in my house?
First, identify and fix any sources of moisture, such as leaks or condensation. Clean small mold patches with a solution of vinegar or hydrogen peroxide. For larger infestations, consider hiring a professional mold remediation service.
Can mold cause health problems?
Yes, mold can cause a range of health issues, from mild allergic reactions like sneezing and skin rashes to more serious respiratory problems, especially in people with asthma or weakened immune systems.
How can I prevent mold from growing in my home?
Keep your home dry by fixing leaks promptly, using dehumidifiers in damp areas, and ensuring good ventilation. Clean and dry areas prone to moisture, like bathrooms and kitchens, regularly.
Is it safe to stay in a house with mold?
It’s generally best to address mold problems as soon as they are discovered. While small patches of mold might not be immediately harmful, larger infestations can pose serious health risks. If you have significant mold growth, especially black mold, consider staying elsewhere until the mold is removed.
What are the best cleaning solutions for mold removal?
Vinegar and hydrogen peroxide are effective for small mold problems. For larger issues, commercial mold removers or bleach solutions (one cup of bleach to one gallon of water) can be used. Always follow safety guidelines when using these products.
Can I remove mold myself, or do I need a professional?
You can tackle small mold problems yourself with proper cleaning solutions and protective gear. However, for larger infestations, mold behind walls or under floors, or if you have health concerns, it’s best to hire a professional mold remediation service to ensure thorough and safe removal.